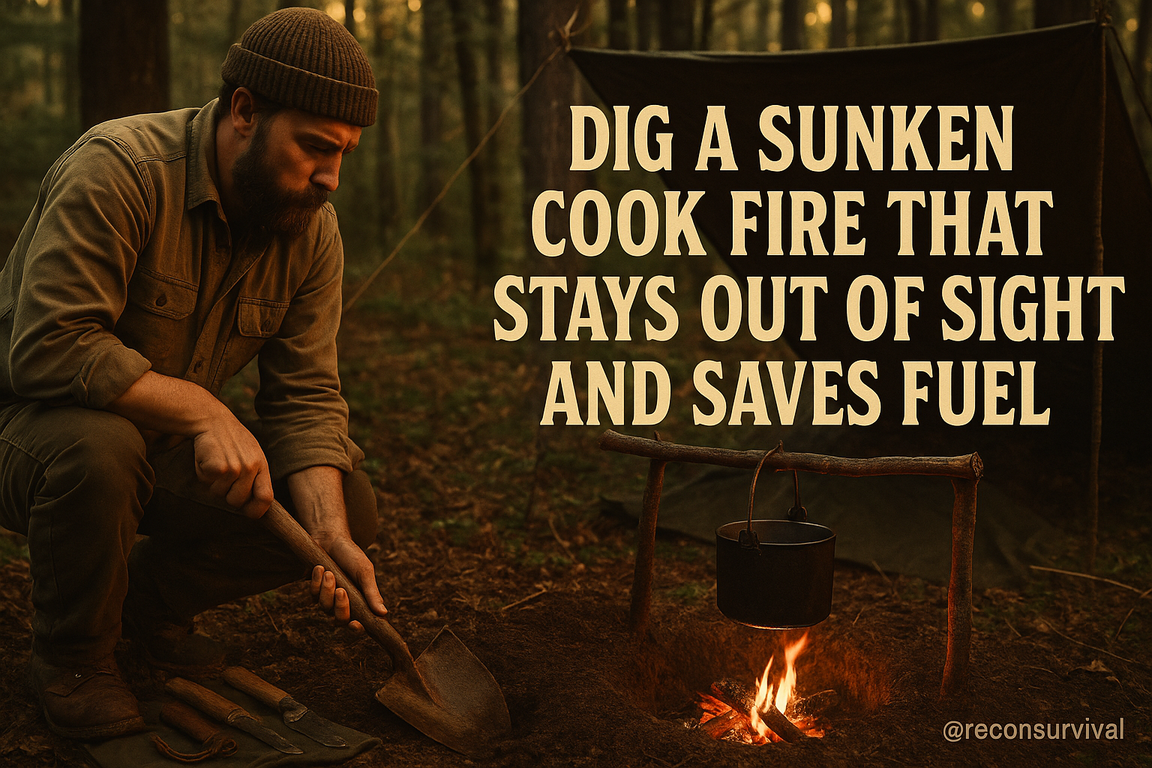
Dusk settles on a ridgeline and you need a hot meal—fast—without painting your position with a plume of smoke. A standard campfire wastes fuel, throws light in every direction, and signals your presence long before the smell of coffee hits the breeze. A sunken cook fire flips that equation. By burying the burn and managing airflow, you concentrate heat where it matters, cut your smoke signature, and keep the flame below the horizon line.
This isn’t theory or campfire folklore. The sunken fire—often called a Dakota fire hole—has roots in indigenous ingenuity and has been favored by woodsmen, smoke-conscious hunters, and small teams who can’t afford to advertise. Properly built, it boils water faster than an open flame with less wood, shields the flame from wind, and lets you cook discreetly in scrub, snow shadow, or even a hedgerow.
In this guide, we’ll go beyond the postcard diagram. You’ll learn when to choose a sunken fire over a stove or twig burner; how to select a site that drafts well and stays invisible; and the exact dimensions that work, from a compact single-shaft hole to a two-chamber system with a dedicated air intake. We’ll cover soil types that hold a wall versus those that collapse, how to construct stable pot supports from green sticks or flat rock, and fuel selection that burns hot and clean. You’ll get troubleshooting for common failures—smoky burns, weak draft, wet ground, crumbly edges—and ways to adapt in rain, wind, or frozen conditions. We’ll finish with safety, extinguishing, and true leave-no-trace closure that erases your presence.
If you want a hot meal without a spotlight—or simply want to make every stick of fuel count—read on. The ground beneath your feet is about to become your most efficient stove.
The Sunken Cook Fire Advantage: When, Where, and Why It Outperforms a Campfire
You pitch camp late, just off a windy ridgeline. You need a hot meal, not a flare announcing your position to every set of eyes in the valley. Instead of a blaze of branches and sparks, you drop your stove kit on a flat patch of mineral soil, dig, and five minutes later a low whisper of flame licks a pot steady as a metronome. That’s the sunken cook fire advantage: heat where you want it, attention where you don’t.
Why a Sunken Fire Beats an Open Campfire
A sunken cook fire—often called a Dakota-style fire hole—uses a small pit and a controlled air channel to create a focused, efficient burn. By sinking the fire 12–18 inches below grade with a diameter of roughly 8–12 inches, you harness three benefits:
- Heat concentration: Earthen walls reflect heat back into the combustion zone and up to the pot. Expect faster boils with less wood—think wrist-thick sticks instead of forearm logs.
- Reduced signature: Flames are hidden below ground level, and the pit protects embers from wind. In calm conditions with dry fuel, smoke drops to a thin gray ribbon that disperses quickly.
- Wind control: The surrounding ground shields the flame, preventing the heat from being blown sideways and wasted.
In short, you convert a wild flame into a targeted burner. It’s not just about stealth; it’s about physics—convection and reflection working for you rather than against you.
When and Where It Shines
- Breezy sites, treeline edges, prairie breaks: The wind protection keeps your flame stable.
- Low-visibility objectives: Backcountry travel near busy routes, hunting camp, or security-minded scenarios where you don’t want a beacon.
- Sparse fuel environments: Efficiency matters when you’re feeding the fire with thumb-to-wrist sized sticks and dead grass stems.
Pick locations with mineral soil, at least 10 feet from brush and duff. Avoid peat, thick root mats, and organic duff that can smolder underground. In rocky ground, shallow your pit and use flat stones to line the sides; in sand, firm the walls with a bit of water or create a narrow neck to prevent cave-ins.
Common Mistakes and Simple Fixes
- Smoke plume: Wet or punky wood smokes. Solution: collect dead, sound wood that snaps clean. Pre-warm damp twigs on a rock near the flame before feeding them in.
- Suffocated fire: A pit without airflow becomes a candle stub. If you’re building the intake tunnel, keep it 4–6 inches in diameter and on the windward side. If you’re skipping the tunnel, narrow the pit’s mouth to focus draft and leave a small gap for air.
- Collapsing walls: Overwide pits crumble. Aim for a hand-span opening (8–10 inches) and tamp the rim.
- Root fires: Never dig under live trees. Probe for roots; if you hit them, move.
Key Takeaways
A sunken cook fire excels when you need speed, efficiency, and discretion. With a small footprint and clever use of airflow and earth, it outperforms an open fire in wind, low-fuel, and low-visibility settings. Next, we’ll break down the anatomy—dimensions, airflow, and layout—so you can build one that lights fast and burns clean.
Read the Ground First: Site Selection, Soil, Drainage, and Wind for a Low-Profile Pit
Read the Ground First: Site Selection, Soil, Drainage, and Wind for a Low-Profile Pit
You’ve hiked until last light, belly low under a scrub oak windbreak. You want a cook fire that won’t silhouette, won’t eat fuel, and won’t advertise your presence. Your first tool isn’t the shovel—it’s your eyes. A sunken pit works because the ground becomes your stove body and your smoke screen. Pick the wrong ground, and you’ll fight slumping walls, pooling water, and smoke that clings like a bad decision.
Micro-Terrain and Line of Sight
Start with position. Favor slight benches or the leeward foot of a rise where the land naturally hides flame and mutes glow. Even a 12–18 inch earth lip does more for concealment than any tarp. Avoid bowl bottoms; they trap cold air and smoke, and they collect water. Stay 15–20 feet from brush or low limbs to reduce radiant ignition risk and signature. If you have to be near a trail or open area, drop just off the crest on the downwind side—smoke hugs terrain and dissipates faster out of view. Leave No Trace still matters: 200 feet from water, camps, and established trails.
Why: Micro-terrain acts like baffles for both light and wind. A small rise blocks sight lines and forces smoke into eddies that scrub it out close to the ground. Bowls reverse that: they pool both smoke and cold air, choking your fire and telegraphing your position with a hanging haze.
Soil Matters More Than You Think
Scratch test with your boot or trowel. Dark, springy, root-filled duff is off-limits—it smolders underground and can travel through roots. You want mineral soil: tan, gray, or reddish, sparsely rooted. Do a squeeze test: if it forms a loose ball that crumbles, that’s loam—ideal. If it ribbons slick and holds shape, clay—usable, but prone to slumping and steam pops when wet. If it won’t hold together, sand—great drainage, poor wall stability.
Actionable tweaks:
– Clay-heavy sites: cut your walls at a 10–15° inward bevel and dry the top inch with coals before cooking to reduce spalling. Keep the pit shallower (6–8 inches).
– Sandy sites: crib the rim with fist-sized mineral rocks or green sticks, or widen to a broader, shallow pan (12–16 inches wide, 4–6 inches deep) to prevent collapse.
– Rocky soils: avoid layered, damp stones that can explode when heated; use only dead, dry mineral rocks if you must.
Drainage and the Quiet Threat of Water
Check for water paths before you dig. Look for rills, gravel fans, and flattened grasses—signs of runoff. In deserts, avoid washes even in clear weather; a pit in a dry arroyo can become a stovepipe chimney for a flash flood miles away. On sloped ground, site your pit on a slight shoulder and put a thumb-sized drain slot on the downhill side. In wet climates, scoop a small sump (3–4 inches deeper than the floor) and fill with gravel to keep the cooking area dry.
Why: A damp floor steals heat, demands more fuel, and forces you to burn hotter—creating more smoke. A simple drain or sump keeps coals dry and efficient.
Wind and Draft Control
Read the wind with grass clippings or ash pinch tests. You want a steady, knee-high breeze—not gusts. Position the pit leeward of a low berm or log to calm turbulence, then align a narrow notch in the rim to feed that breeze across the coals. If the wind is inconsistent, set up in the wind shadow of a boulder or dense shrub cluster; you’ll trade a bit of draft for a lot of control.
Why: Controlled draft burns hotter and cleaner at lower fuel loads, reducing smoke and signature. Turbulence flips sparks and inflates the footprint; dead air smothers and smokes.
Common mistakes and fixes:
– Smoke won’t lift: you’re in a cold sink. Move 10–20 feet upslope or open a wind notch on the upwind rim.
– Walls slumping: soil too wet or clay-rich. Shallow the pit and bevel sides; preheat and dry the rim before full fire.
– Persistent smolder: you dug into duff. Extinguish fully, relocate to mineral soil—don’t risk a root fire.
Key takeaway: Choose ground that hides glow, offers mineral soil, sheds water, and gives you a predictable, gentle draft. Get those right, and the pit becomes an efficient, low-signature tool. Next, we’ll shape the geometry—depth, width, and rim features—to lock in clean burn and fuel savings.
Build It Right the First Time: Dimensions, Air Intakes, and Reinforcement for a Reliable Dakota-Style Hole
You’ve hiked hard all afternoon and you’re losing light. Dinner needs to happen fast, quietly, and with the least fuel you can scrounge. This is where a well-built Dakota-style hole earns its keep—if you size it right, place the intake correctly, and keep the walls from collapsing. Do it once, do it right, and you’ll have a steady, smokeless flame that boils water in minutes and leaves almost no trace.
Dial in the Dimensions
For a solo or two-person cook setup, the fire chamber (the “chimney”) should be 6–8 inches in diameter and 8–12 inches deep. That size concentrates heat under a mug or small pot while minimizing fuel. For group cooking or a 2–3 quart pot, go 10–12 inches in diameter and 12–16 inches deep. Deeper chambers produce a hotter, cleaner burn because the flame path is longer and the walls preheat incoming air.
Space matters: place the intake hole 8–12 inches from the center of the fire chamber. Your connecting tunnel should be 3–4 inches in diameter—big enough for airflow, small enough to keep draft velocity high. Think of it like a carburetor: too big and you lose velocity; too small and you starve the burn.
Why these numbers? They balance draft and fuel economy. The narrower, deeper chamber funnels heat directly up to cookware, while the small intake forces oxygen to jet into the fire base. The result is high-temperature, near-complete combustion—and very little smoke.
Get the Air Intake Geometry Right
Dig the intake hole upwind of the fire chamber so prevailing wind feeds the draft. Angle the connecting tunnel slightly downward—about 10–15 degrees—from the intake to the base of the fire chamber. That slope prevents ash from rolling into the intake and ensures cold air meets hot coals directly where it’s needed.
At the junction, open the tunnel into an oval about 4–5 inches tall so air can spread under the fuel bed. If you see smoke “puffing” at the intake, your tunnel is too shallow or flat; ream a cleaner path so airflow is unobstructed.
Reinforcement and Pot Support
Sandy or loamy soils slump. Shore the fire chamber by lining it with fist-sized stones, a 1/2-inch clay slip, or a ring of green sticks (bark on) pressed vertically against the wall. In damp ground, tamp a 1-inch layer of gravel or green stick lattice on the chamber floor to keep coals out of mud.
Create a pot support by leaving a 1/2-inch stone or soil lip around the chamber rim, or lay two parallel thumb-thick green sticks across the opening with 1–2 inches of clearance between them. Keep that gap tight; excess spacing bleeds heat.
Troubleshooting on the Fly
- Weak flame: Widen the intake to 3.5–4 inches or shorten the tunnel. Check for kinks or collapses.
- Excess smoke: Fuel may be wet, or the chamber is too wide/shallow. Deepen the chamber by 2–3 inches; reduce surface opening with a partial cover of flat stones.
- Cave-ins: Increase center-to-center distance to 12 inches, add a stone or stick lining, and avoid tunneling through root mats.
- Long boil times: Raise the pot 1–1.5 inches above the rim for optimal draft around cookware; too high loses heat, too low chokes the flame.
Key takeaway: precise dimensions and a clean, sloped intake transform a hole in the ground into a high-efficiency stove. With the structure dialed, you’re ready to light clean and manage the burn—next, we’ll cover ignition, fuel staging, and keeping the draw steady.
Clean Burn, Less Fuel: Lighting, Feeding, and Managing Draft for Low-Smoke Efficiency
Clean Burn, Less Fuel: Lighting, Feeding, and Managing Draft for Low-Smoke Efficiency
You’ve got the pit dug, the intake tunnel shaped, and a pot waiting. Dawn air is still, and you’d rather your breakfast not advertise your camp. The difference between a ghost of steam and a plume of smoke comes down to how you light, how you feed, and how you manage the draft. Think hot, fast, and controlled.
Top-Light to Start Clean
Treat the sunken fire like a top-lit updraft stove. Stack fuel in the burn chamber from small to larger: a base of pencil-lead shavings or cotton ball with petroleum jelly (pea-sized is enough), a handful of matchstick twigs (2–3 mm), then two handfuls of pencil-thick sticks (5–7 mm) laid crisscross for airflow. On top, place thumb-thick pieces (10–20 mm), cut to 6–8 inches to fit your chamber.
Light at the top, not underneath. Why: as the flame front moves downward, fresh air drawn from the intake meets hot gases above the fuel bed, burning them before they can cool into smoke. You’re essentially creating a small TLUD effect in dirt. Expect 30–60 seconds of kindling flame, then a steady, bright burn with very little visible smoke.
Troubleshooting:
– If it smolders after 30 seconds, your fuel is damp or too tightly packed. Pull a few pieces to open gaps and pre-warm suspect sticks on the rim for a minute.
– If flame snuffs when you set the pot, you’ve sealed the chamber. Maintain a 1–1.5 inch gap beneath the pot with green-wood sticks or three stones.
Feed Small, Hot, and Often
The cleanest fire runs on small-diameter, dry fuel. Hardwoods (oak, maple, hickory) give dense, steady heat; softwoods (pine, spruce) burn fast and hotter but need more frequent feeding and can smoke if resin is cold.
- Keep a rotation: three to five pencil- to finger-thick sticks on the flame at any given time. Add one or two every 30–60 seconds rather than dumping a pile. This keeps surface area high and combustion hot.
- Aim for the flame tips licking 1–2 inches below the pot. Taller flames waste heat up the sides; shorter means you’re starving it.
- Stage backups: lay damp sticks across the rim to steam off; slide them in when weight drops. This “preheat shelf” saves fuel and keeps smoke down.
Common mistakes:
– Overfeeding early. Too much cold mass drops chamber temperature and makes tarry smoke. Resist the urge—let the first load char and catch before adding.
– Long pieces bridging across the hole. They form a lid. Stick to 6–8 inch lengths that sit within the chamber.
Tune the Draft, Don’t Fight It
Your intake tunnel is the throttle. As a baseline, keep its cross-sectional area at about 30–50% of the burn chamber. That’s usually a 3–4 inch intake feeding a 6–7 inch burn hole.
- Wind: Face the intake downwind for a gentle vacuum; if a gusting tailwind is over-drafting (roaring flame, wasted heat), slide a flat rock to narrow the intake by a third. In dead calm, crack it open fully or elevate one side of the pot slightly to vent more top air.
- Altitude and cold: Thin air or freezing temps slow ignition. Use extra kindling and a slightly wider intake at start-up, then choke back once the chamber is hot.
- Pot as baffle: A low, even gap under the pot promotes secondary burn. If you see brown soot building fast, you’re quenching the flame—raise the pot or increase intake briefly.
Fixes for smoke flare-ups:
– Remove the pot for 10–15 seconds to let the flame re-establish, then replace with a proper gap.
– Stir the top layer with a stick to break up a crust of ash.
– Slip in two pencil-thick, bone-dry twigs—fast heat spikes clean up vapor.
Real-world benchmark: With dry hardwood and tuned draft, you can bring 1 liter to a boil in 6–9 minutes in still air, using a couple of tight bundles of pencil-to-thumb wood—no wrist-thick logs required.
Key takeaway: Start with a top-light for clean ignition, feed small and steadily to keep the chamber hot, and use the intake and pot gap as your adjustable air valves. Next, we’ll translate that controlled flame into precise cooking—simmering, searing, and baking without blowing your cover.
Cook Like a Pro in a Pit: Grates, Pot Suspension, Baking Methods, and Heat-Zone Control
Dusk settles and the pit glows like a lidded lantern. You’ve got water at a low roll, bannock rising under a lid, and a trout ready to kiss the heat—all without kicking sparks sky-high or feeding the fire every five minutes. Cooking like this is part tool choice, part heat management. Dial both in, and a sunken fire turns into a compact, efficient kitchen.
Grates That Fit the Pit
A proper grate lets you move food, not fire. For a 24 x 18 in pit, a 12 x 18 in grate of uncoated steel (rebar or expanded steel, 1 in spacing) sits neatly on ledges carved 1–2 in into opposing walls. Keep the grate 2–3 in above the coal bed for searing and 4–6 in for general cooking. If you didn’t pack a grate, set two thumb-thick green sticks or 3/8 in steel rods as rails and lay short, green cross-sticks for low-temp uses like toasting or drying; swap to metal the moment you want serious heat.
Why: a low, close grate concentrates radiant heat, minimizing fuel burn and visible flame. Ledges also keep the camp profile clean—no wobbly rocks towering above the rim.
Troubleshooting and tips:
– Avoid galvanized metal (zinc fumes are toxic). Uncoated steel or cast iron only.
– If the grate sags, add a center support: a fist-sized rock or a short rod spanning the pit crosswise.
– Sooty pots mean flame contact or resinous wood. Feed hardwood splits, let them coal, then cook on the glow.
– Preheat the grate, scrape with a stick, wipe with a little oil—food sticks to cold, dirty steel.
Pot Suspension and Fine Control
When you want the grate free for meat or bread, hang the pot. Cut shallow notches on both long walls and seat a 1–1.5 in green sapling or a steel rod across the pit. Use a stainless S-hook and chain, or a field trammel: a baton with spaced notches; a peg through a chain link bites into the notch for instant height changes. Typical working heights: 6–8 in above glowing coals for simmer, 8–10 in for keep-warm.
Why: suspension decouples the pot from flare-ups and lets you fine-tune temperature without shuffling coals.
Common mistakes:
– Crossbar too close to the rim—handles scorch and the bar can roll. Set it 2–3 in back from the edge and seat it in real notches.
– Nylon cord near heat (it melts). Use wire, chain, or greenwood toggles.
– Unbalanced loads. Test your setup at twice the pot’s weight before committing dinner.
Bake Like a Vault
Top heat is the secret. In a 10 in Dutch oven, think “thirds”: 5–7 ember “hockey pucks” beneath, 10–12 on the lid approximates 325–375°F. Use a 1/2 in flat stone or three pebble spacers under the oven to prevent scorched bottoms. Rotate the pot and lid 90° every 5 minutes for even browning.
No Dutch? Try a cloche bake: lay dough on a leaf atop a flat stone, invert a metal bowl or second pot, and seal the rim with a ring of damp soil. Leave a pencil-width vent on the leeward side. You get gentle convection, moisture retention, and minimal light signature. For ash cakes, bury wrapped dough at the edge of the coal field (warm ash, not red coals) 8–12 minutes, then finish with a quick toast on the grate.
Troubleshooting:
– Burnt bottoms: fewer embers below, add more to the lid. Use spacers.
– Pale tops: you lack top heat—add two embers and wait, don’t boost flame.
– Bitter smoke: cook on fully formed hardwood coals. Char first, then bake.
Heat-Zone Control: Two Burners, One Fire
Make the pit work like a stovetop. Rake a “hot side” of deep coals and a “holding side” of thin coals and ash. Carve a 4 in shelf into the leeward wall and pull a 1–2 in carpet of coals onto it—instant simmer zone out of direct blast. Maintain a small feed slot upwind to add wrist-thick splits; let them flame briefly, then rake coals where needed.
Use the hand test at grate height: 2 seconds = sear, 4–5 = sauté, 6–8 = simmer. Slide pans or raise/lower the trammel instead of chasing temps with extra fuel.
Common mistakes:
– Overfeeding and cooking on flame (wasteful, sooty). Wait for coals.
– One big coal bed instead of zones. Always bank and refresh in small doses.
– Wind tunneling through the pit. Use a soil berm on the windward rim to calm airflow without raising your profile.
Key takeaway: lock in a solid platform (grate or hanger), bake with top heat and insulation, and run distinct zones. You’ll cook faster, burn less wood, and keep your footprint low. Next, we’ll shut it down clean—banking coals for morning and erasing the pit like you were never there.
Invisible on Exit: Extinguishing, Camouflage, and Fixing the Mistakes that Give You Away
Dawn is gray and windless. You’ve cooked, packed, and you’re ready to move—but a sunken fire can betray you long after you’re gone. Heat lingers below ground, ash flashes white against forest duff, and your boot tracks frame the scene like arrows. The exit is where stealth skills either shine or unravel.
Extinguish to “Cold-Out,” Not “Looks-Out”
How: For a shoebox-sized pit (roughly 12 x 12 x 8 inches / 30 x 30 x 20 cm), plan 2–4 liters of water to fully quench. Pour slowly while stirring with a stick, breaking apart clinkers until you hear no hiss. Flood the walls and corners—roots love to hide heat there. Stir again, wait five minutes, and repeat with another liter if any warmth remains. Finish by feeling for heat with the back of your hand at several points for 10 seconds each. The ash should be cool enough to comfortably sift through with bare fingers.
Why: Soil is an insulator. If you bury coals under dry dirt, you create a slow cooker for a holdover fire that can smolder in roots and re-ignite with a breeze. Water removes heat and oxygen; dirt alone only removes oxygen.
Troubleshooting:
– Steam plume when you stir? Keep pouring and prying apart chunks until the steam stops.
– Night move under thermal risk? Start your extinguish sequence 30 minutes before departure; anything warmer than ambient glows on optics.
– No water? Use snow packed into the pit, or sand-to-slurry: drench soil with what water you have, stir to make mud, and keep working until mud is uniformly cool. Prioritize water over schedule.
Common mistake: “Warm is fine.” It isn’t. If you can’t comfortably hold ash in your hand for 10 seconds, it’s not cold-out.
Camouflage That Passes the 3-Second Scan
How: Once dead-cold, scatter a thin layer of mineral soil over any soot, then re-lay the original duff (leaves, needles) you set aside. Break up straight lines: riffle the pit edge with your fingertips and boot heel to mimic natural micro-chaos. Replace any displaced rocks in their original orientation—lichen side up—and dust off any soot with damp soil. Brush out footprints using a leafy branch, moving from the center outward, and stop where natural sign already exists (game trail, wind-scuffed ground). If fresh soil looks bright, dust it lightly with local litter and tap it down with the flat of your hand to match surrounding texture and reflectance.
Why: Human geometry catches the eye—square edges, uniform piles, and bright mineral soil against dark duff read as “man-made” from a surprising distance.
Troubleshooting:
– White ash halo? Mist with water from a bottle or squeeze from a damp bandana, blend with a pinch of soil, and cover thinly with duff.
– Wet-black “soot freckles” on leaves? Flip them over or swap with clean leaves from a couple meters away.
– Flattened grass? Pinch stems and tug gently back upright; a light mist helps stems set.
Fixing the Tells Before You Step Off
- Buried heat: If you covered before cold-out, uncover, re-drench, stir, and cool. Don’t leave warming soil.
- Food odors and grease: Wipe pots with a handful of ash and a splash of water, then towel and bag the towel. Grease is a wildlife beacon.
- Micro-trash: Tea tags, foil seals, fiber char from paracord—pick palm-to-ground and bag. Charcoal briquettes? Pack out; natural wood charcoal can be scattered thinly over mineral soil if stone-cold.
- Cut marks and snapped branches: Avoid fresh green cuttings as camouflage. If you must bend, do it at the node and rough the break to look storm-made.
Key takeaways: End cold, then end visible. Kill heat with water and patience. Break geometry, match color and texture, erase tracks without creating a new pattern. Your best proof of success is that you can’t find the site on your second look.
A sunken cook fire earns its keep by doing more with less—less fuel, less smoke, less signature. The common thread through every step is intention: you read the ground, you shape the draft, and you cook to the fire you built. Get those three right, and you’ll boil faster, bake steadier, and leave nothing but cool soil behind.
Make it real with a short, controlled test. This week, dig a practice pit in mineral soil, away from duff and roots. Cut a clean-walled fire chamber roughly forearm-deep with a palm-wide draft tunnel upwind, then reinforce the rim so it doesn’t crumble under a grate. Time a liter boil, weigh the sticks you burn, and note wind direction versus smoke behavior. If you get smoke, widen or smooth the intake; if it floods, add a small sump or pick higher ground; if the rim slumps, shore it with flat stones or split green sticks.
Build a pit-cooking kit you actually carry: compact shovel, 10–12 inch grate or two sturdy crossbars, three stakes and wire for pot suspension, a square of heavy foil for baking, gloves, and a small brush to erase sign. Practice heat zones—coals to one side for simmering, fresh feed on the other—and rehearse a fast, cold-out and camouflage before you walk.
Master this, and you’ve got a quiet, fuel-stingy kitchen that travels anywhere you can sink a shovel. Put a hole in the dirt, make a meal, and make it disappear.